What are these for anyways? Plus Clipping masks

Since there’s no way to select multiple categories, here is something that has been bugging me.

Apart from the ‘standard’ layer modes all other painting programs have, plus:

Destination In, Destination Out, Source Atop, Destination Atop.

I tried googling about those and tried to understand what they are for, to no avail. Their names are generic and don’t seem to mean what they actually do. That would be one thing.

The other is about the whole ‘clipping layer’ mechanism.

After finding the only post that seems to actually explain how these work, it still doesn’t make sense. The system is the opposite of what every other art program does and, due to the weird layer modes you have to set, is not intuitive and hard to use, to the point where I gave up halfway into it because it doesn’t do what I want it to do and decided to use krita for the rest of the drawing I had to finish. Combine that with the forced way of you having to set groups to affect multiple layers and you have, at least IMO, a program that actually slows you down.

Why can’t the clipping behave like the other programs do? You put a layer on top of another and maybe there’s a option in the layer or a layer mode that is restricted to the alpha of the layer below it, not the opposite.

The modes you mention allow you to do clipping in either direction (ie. mask by ‘top’ layer or mask by ‘bottom’ layer), AFAIK. They are generic Porter-Duff operations; you can see a visual table of the different Porter-Duff ops at Porter/Duff Compositing and Blend Modes – Søren Sandmann Pedersen .

These modes are standard in SVG and have been for 5 years : SVG Compositing Specification

Okay? Now I know less than I did before reading both links.

Hmm. How should I put this…

“I don’t actually care.”

Yeah, I think that covers it. I’m willing to provide citations and details, not walk you through this stuff.
You will need to do a bit of research in order to make a stronger argument than
“I’m not sure what MyPaint is doing with masks, but it isn’t what I want. Do what I expect instead.”

(From which IMO the only feedback a developer can reasonably take is that masking is more confusing than it could be. I agree personally, but it does not then follow that the way other programs are doing it is the right way to go.)

In issue 181 you can see that further simplifications have been discussed. The current implementation is simply what we’ve done so far. Simplifications will depend on a) agreeing on precisely what should happen and why, and b) someone actually implementing it.

@tilkau Kinda not helping there. Most people don’t care about the mathematics of the operations, or what some random SVG standard says, and you’ll likely be scaring off new users. For my part, this is something the manual should cover. I wish I had more time to complete the thing… :unamused:

@MR4Y sorry about that. They have a point though. We’ve got the basic operations available (that’s what grouping and those oddly-named modes do), it’s just a matter of putting them together in the interface in a way that actually makes sense. It is more confusing right now than it needs to be. I just need a better UI strategy for associating a bunch of layers with their mask.

(Why do it the way we did? It’s simpler, and perhaps expressive enough to do everything.)

Practically speaking, there has to be a lot of agreement about what can go in the file format we use too. I’m hoping to be talking with a bunch of interested parties at LGM2016 (15-16 April! Yikes!) about the future of the OpenRaster format. We may come to an agreement about layer/group masks there that’s more sensible than what MyPaint does right now.

@tilkau If a user doesn’t know or doesn’t understand a feature or how a feature works, you might as well claim that your program is inferior because the feature doesn’t exist. Simple as that.

@achadwick I understand. But, there’s a problem when only the people who implemented the feature know how it works and how to use it. They might as well just put it on their personal version of the program. Due to the complicated nature of it, I just tell people that MyPaint doesn’t have clipping masks or anything of the sort. Problem is, most of the people I know use these things in other programs and it’s part of their workflow, so they end up not using MyPaint.

Personally I’m happy that the feature is there even though I wasn’t able to figure it out entirely on my own at first.

Honestly, your statements comes across as more petulant than constructive. Why not draw some user interface ideas on how this could be solved instead? I’m sure the developers would take them into consideration.

I want MyPaint to have the best interface, not just copy other programs to be compliant with some sort of informal industry standard if there is such a thing. :slight_smile:

@bleke I am not a GUI designer nor a graphic designer, so I can’t do that.

@MR4Y You don’t have to be a graphic designer to draw our you ideas for UI. Heck they don’t even have to be pretty. All they have to do is illustrate your ideas.

@odysseywestra In order for me to propose something, I have to understand how the thing works first, which is not happening to begin with.

@MR4Y You going have to play around with it. Its as simple as that.

To answer your question, Destination In and Destination Out are basically Mask In and Mask Out and effect the layer(s) below the one it’s applied to. They are designed use that upper layer to hide parts of the layer(s) below it depending on whether you want to hide what is on the outside(Destination In, Mask In) of that layer or hide what is in the inside(Destination Out, Mask Out) of that layer.

Source Atop and Destination Atop effect the layer itself depend on what’s below that layer. Source Atop uses the layer(s) below as the source and hides what is on the outside of the sum of those layer(s). Destination Atop use itself as the source and adds the sum of the layer(s) the upper layer is covering below to itself, and hides anything beyond the upper layer’s boundaries.

In order for those modes to not effect all the layers below it(including the background layer), you have to use layer groups, and apply the layer mode within those groups.

At first it seems confusing, but once you get it, it makes sense on how they work. It took me a bit to figure out, so I understand how you feel. However to lessen confusion about those layer modes, they should be renamed to what they do. Not what they are. I will plan to tackle that once I get the keyboard shortcuts finalized and implemented.

Beyond that, you are going to have to play around with it and experiment.

@achadwick It’s a bit weird to say “most people don’t care about the mathematics of the operations” when a) OP specifically said “what are X, Y and Z modes?” and b) I chose those references because they are visual – you can see what happens without needing to go into maths.
Similarly, since OP made allusions to non-standardness, it seemed necessary to demonstrate that these operations are very much standard (SVG being just one example of their use).

Ultimately, I chose to post those things that OP will need in order to make a proposal more coherent than ‘do things in the same way as other paint programs’. I edited the post multiple times in order to make it as constructive as possible. IMO, that includes a challenge to take some responsibility for moving this forward.

Indeed, OP acknowledges that they need to understand how this stuff works in order to make a clear proposal.

I’ll just throw out an idea here, would something like this be possible?

@tilkau I’ll put it this way. What if in order to use a light table, instead of drawing on a piece of paper placed over the drawing you’re trying to copy, you’d have to somehow draw on a piece of paper that’s placed under it? Would that make sense? I don’t think so. Would that be easy/intuitive to use? Probably not.

I played with it a bit and, the only things I can gather from these are:

-Destination In make the top layer become the canvas for some reason, whilst putting anything under it inside it,

-Destination Out makes the top layer transparent whilst keeping everything under it.

-At least the way I checked it, Source Atop is pretty much the same as not doing anything and just placing the layer on top in the layer stack.

-Destination Atop seems to do the same thing as Destination In.

Now that I have a rough idea what these do (in theory), I still have no idea when to use what, so, still left the same way I came in.

@bleke That would be pretty much what Krita’s ‘Transparency Mask’ does, however, it only affects the layer that has the mask.

That’s because you are unintentionally applying it to the canvas (see my explanation below).
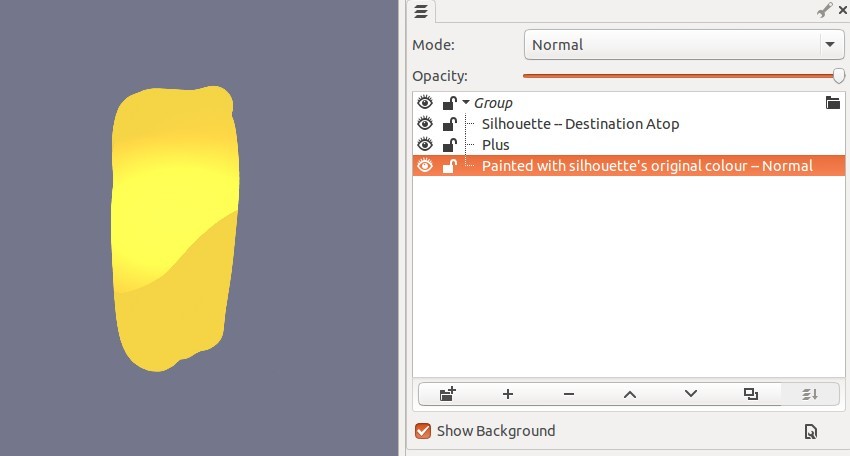
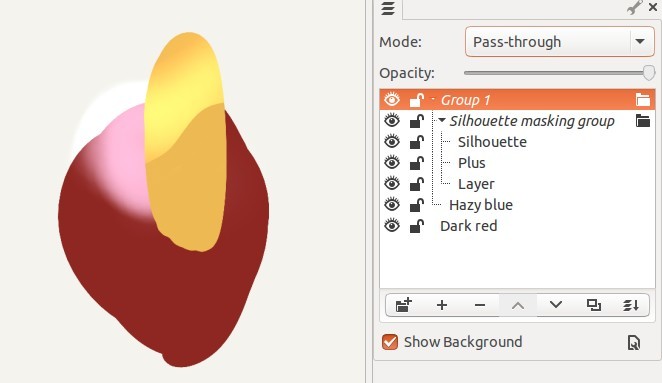
If you isolate it in a group, then you can easily see its actual behaviour: Areas that are transparent in the layer, are made transparent in the result. (or to put it another way, transparent areas in the layer are ‘cut out’ / ‘removed’ from the result.)

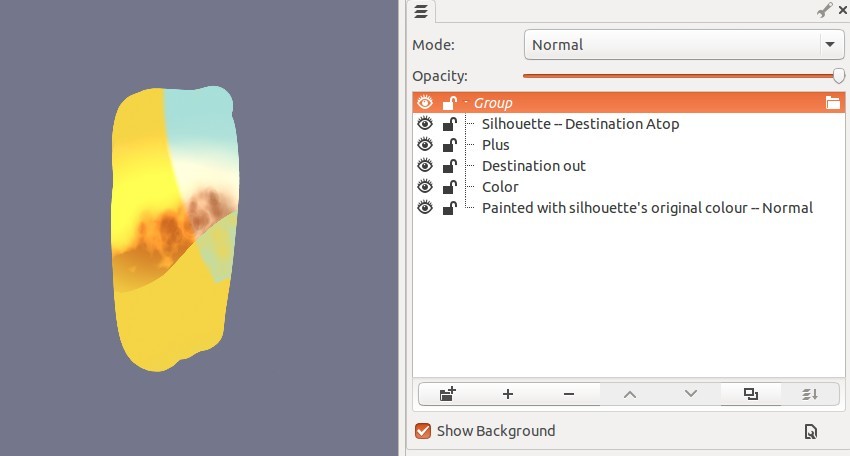
If that’s what it is actually doing, then that is a bug. Destination Out should cut the area covered by Src away (or to put it another way, it should OUTput the pixels that are only opaque in DEST)

Also sounds like it would be a bug if this is really what is happening; Source Atop should use Dest (the bottom layer) as a mask for Source, so that the places where both Src and Dest are opaque contain pixels from Src, and all other places contain pixels from Dest.

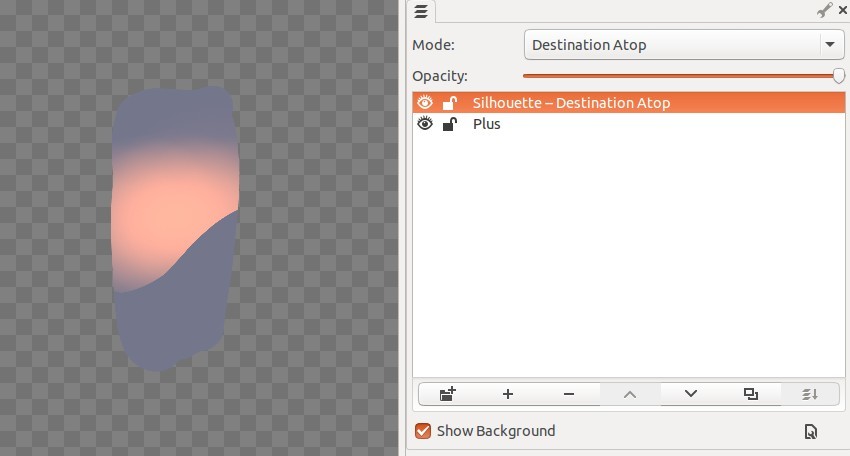
Also sounds like it would be a bug if this is really what is happening. Destination Atop should show pixels from Dest in places where Dest and Src overlap, and pixels from Src otherwise.

(compare to Destination in, in which pixels from Dest are shown in the areas where Src overlaps dest, and transparency in all other locations)

The descriptions given here match the “how they look” diagrams found on the porter-duff page that I previously linked.

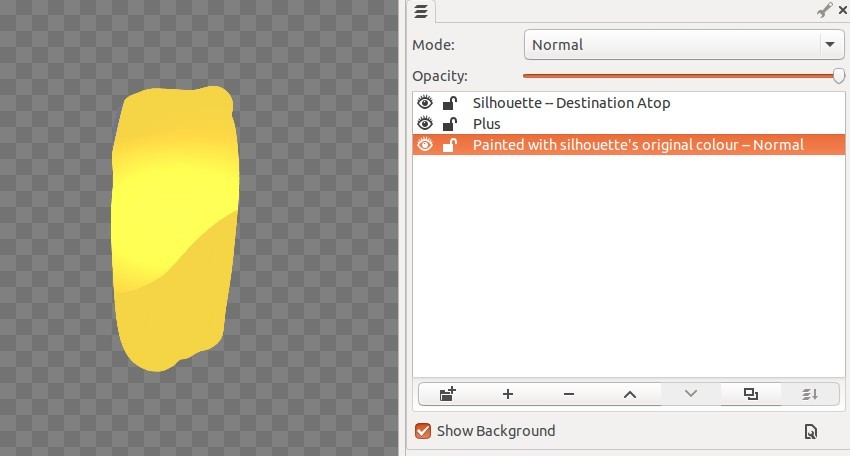
EDIT: I’ve just rebuilt MyPaint and tested the above layer modes. My results are:

  • Dest In: As I described above. √
  • Dest Out: As I described above. √
  • Src Atop: As I described above. √
  • Dest Atop As I described above. √

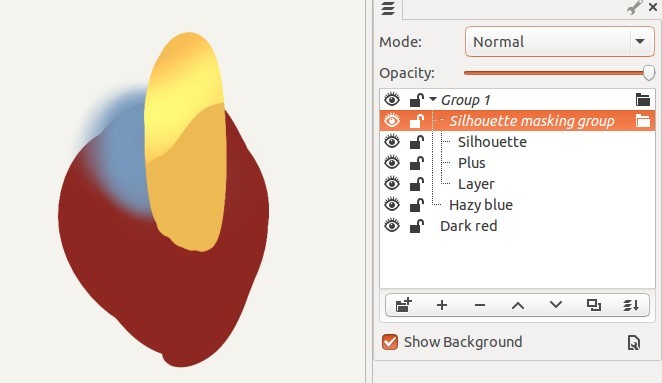
One factor that I guess may be confusing you here is that in Mypaint, the background layer is implied. This leads to results such as “‘Dest in’ removes canvas for areas that aren’t in Src”. That’s a result of the fact that compositing is done bottom-to-top (as is standard in most paint programs), and this is the reason that isolating it in a group is necessary.

I can write it out like so:

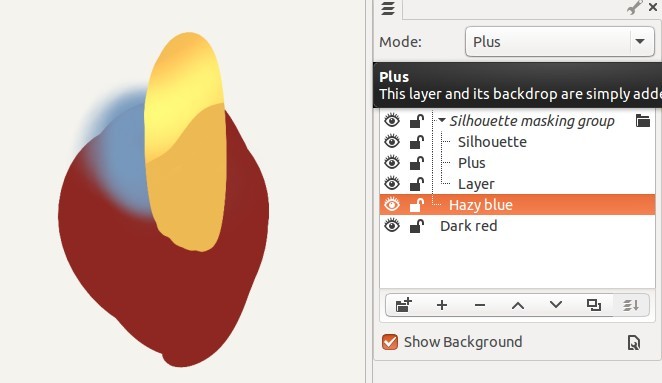
  • supposing you have two layers B and C, with C being set to ‘Dest In’ mode
  • first, the layer B is applied to the background. In this operation, B is Src and background is Dest. We will call the result of this “RESULT1”
  • second, the layer C is applied to RESULT1. In this operation, C is Src and RESULT1 is Dest. We can call the result of this ‘FINAL’
  • Since the layer mode of C is ‘Destination in’, the parts of RESULT1(Dest) that were not in Src have been made transparent

Hopefully that illustrates what is happening, and why isolating things in a group is currently necessary.

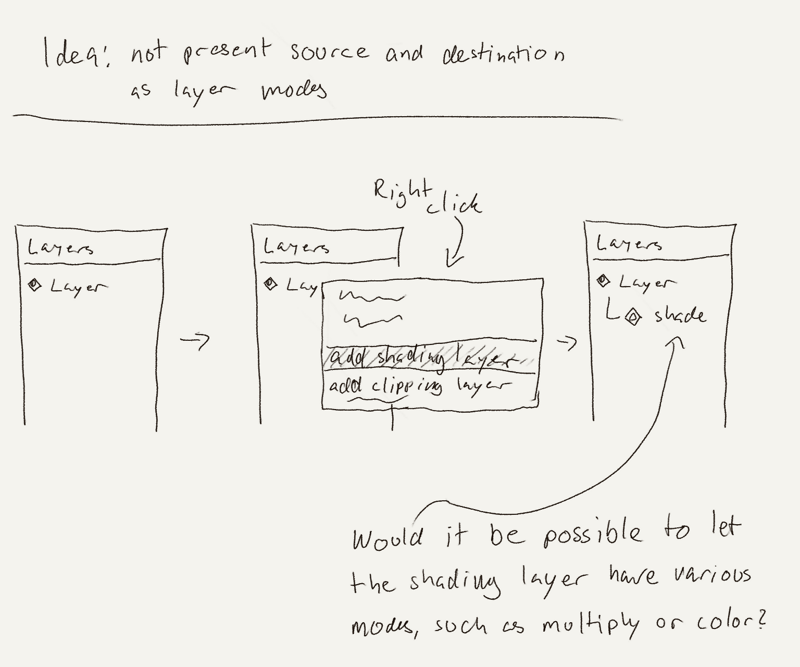
@bleke : That’s basically Photoshop’s model, IIRC. So it’s definitely possible, the question is what is the best design?
I believe the ‘separate clipping layer’ model was already considered, and was judged as a bit too inflexible.

@tilkau Shouldn’t any layer mode work on its own? Because, now I can’t determine if:

  • Is the mode working the way it does by design?
  • Is the mode working the way it does because of a bug?
  • Does the mode has to be inside a group to work properly? And if so:
    • How should it be arranged stack wise inside the group?
    • Is the mode working the way it does inside a group by design?
    • Is the mode working the way it does inside a group because of a bug?
    • Can other modes be affected by the behavior of this mode inside a group? And if so:
      • Are they suppose to work/not work by design?
      • Are they behaving like such because of a bug?

I end up not using them at all because I have to answer all these questions before considering using it. If the whole thing was intuitive, the only thought I should have is:

  • I want to do X. I can use Y to do X. Y works like such and such. I could also use Z, that works like such and such. Either one of those will make me do X or help me do X.

Ans this is not happening. This is time I should be using drawing and not thinking about implementation details.

Modes are completely consistent. That is why Destination In/Out masks all layers in the stack it is in, (including the background if applicable – the background is part of the top level stack). It can easily be demonstrated that this works just the same as other layer modes, simply by starting a new document, painting a colored shape on the single default layer, cycling through different layer modes, and watching the results.

If anything, the fact that the background is an ‘implicit layer’ here is a bigger UI problem, and the real difference from other programs (which typically treat the entire layer stack as if it’s in a group using Normal mode, WRT compositing it onto a background.).

I’m beginning to have some real success with the layer modes now.

I’ll post a few screenshots of my research findings here. Maybe it will help MR4Y a little. :slight_smile:


Here’s my usual scenario, I have a silhouette layer and a shading layer I want to limit so that it only shows within the silhouette. The shading layer has the mode “Plus” in this case.


Moving the silhouette layer to the top and making it “Destination Atop” limits the Plus layer to the silhouette boundaries, but the background layer has disappeared and the colour is wrong.


The colour is fixed by adding a normal layer at the bottom of the stack and painting it with the silhouette’s original colour.


To get the background layer back we have to put the layer stack in a group.


Last step is to add more layers with various modes and have fun with this powerful feature. :slight_smile:

1 Like

@tilkau Modes may be, but the way they’re integrated is not consistent in comparison with other programs. Plus, I don’t think other programs have the ‘extra’ modes that cause so much confusion.

@bleke Yes, but does this work for groups inside groups?

If you had tried it you would have known. But yes, it does.


Here it is, group within a group. Nothing special compared with the examples above.
The dark red blob isn’t in a group. The hazy blue blob is in Group 1, and the rest is in Silhouette masking group.


If I make the hazy blue blob a “plus” layer, nothing happens, because it doesn’t have anything to interact with.


But if I change Group 1 from “normal” to “pass through”, it will let the modes of layers inside it pass through to the next level. (or previous, depending on how you see it)