Well done! This looks really promising.
Thanks Bleke. Here’s another demo that tries to be more clear about what each setting does:
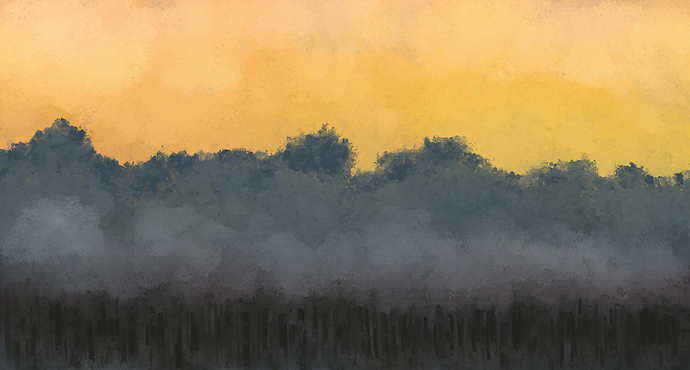
This is using an out of the box devaad watercolor brush:
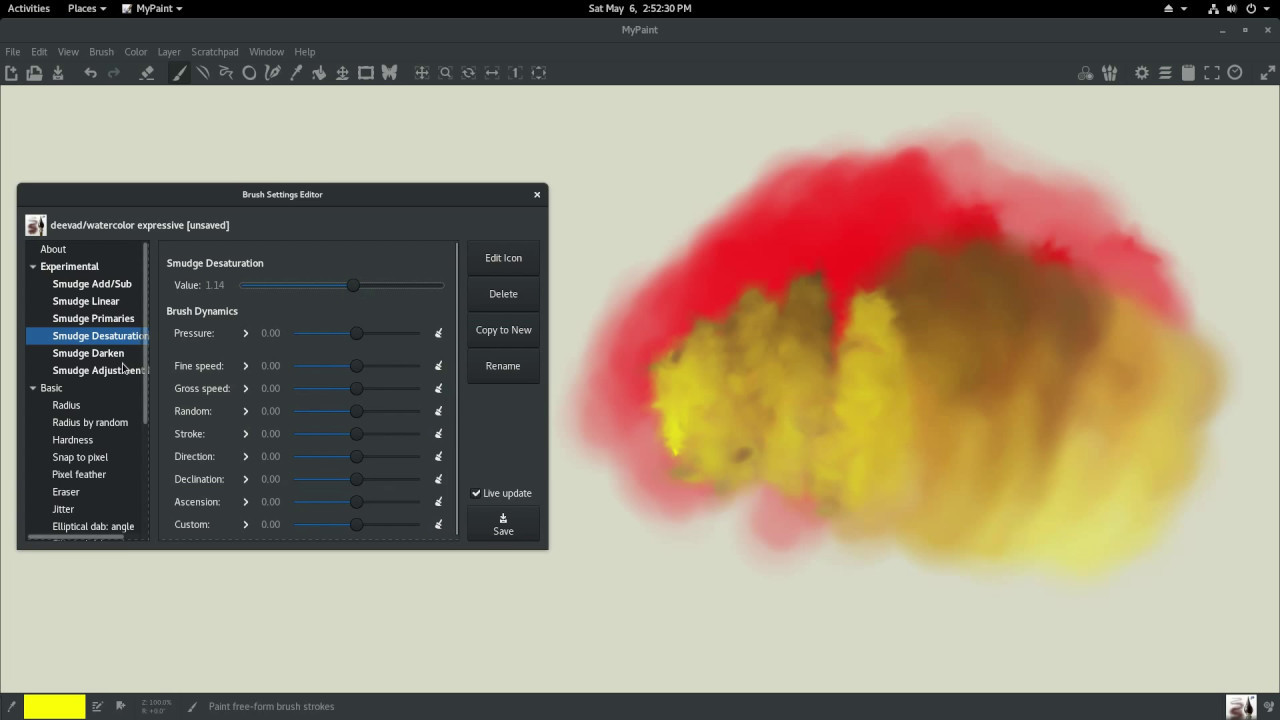
Here’s a teaser. I have most of Scott Burns’ Spectral method working. The screenshot below is a smudge color hard-coded to 0.7,0.7,0.0-- which is a somewhat dark yellow. edit Actually I hard-coded the Smudge State color and the Get color to this value, which was then multiplied together to get an even darker yellow. The brush color is 100% saturated colors and I just went around the color wheel and smudged around with the deevad watercolor brush. The smudge is hard coded as I’m having problems with it getting dark…
I’ve moved the Subtractive mode to its own branch, “Burns”: https://github.com/briend/libmypaint/tree/Burns
To test it you’ll need to generate the rgb.txt data file with the included script in the RGB folder (using gnu Octave). Expect it to take more than a day to generate :-(. It will be 12GB on disk and use 2.3GB of RAM.
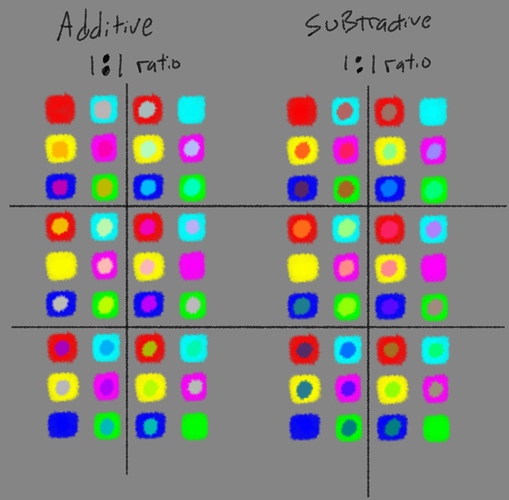
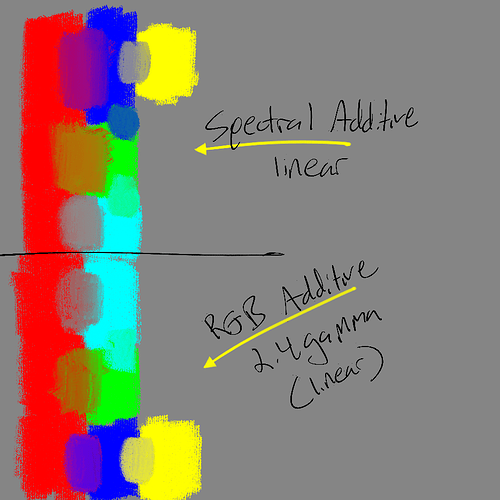
Here’s a test comparing additive and subtractive with smudge 0.50 and smudge_lock on, and gamma @2.4. Smudge_lock is a new setting to lock the smudge color as soon as the stroke starts. This makes it really easy to either mix color ratios exactly, like 50/50. 80/20,etc or just control the mix with pressure. Without Smudge_lock the original canvas color is quickly lost depending on smudge_length. Setting smudge_length to 1.0 doesn’t even grab an initial smudge color (maybe it would make sense to change that instead of making smude_lock setting).
Each block of six colors has one color mixed with rest in the block (ie, upper left, red is mixed with the other 5)
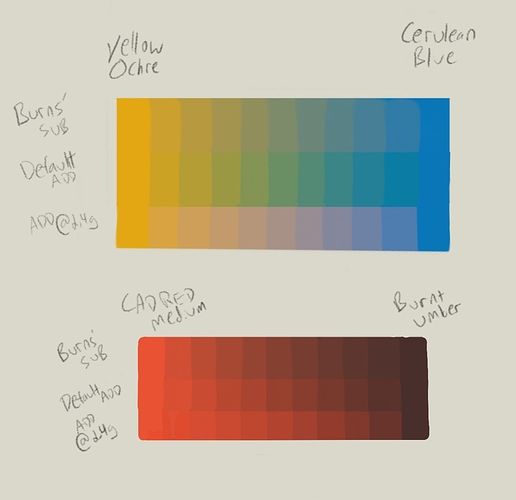
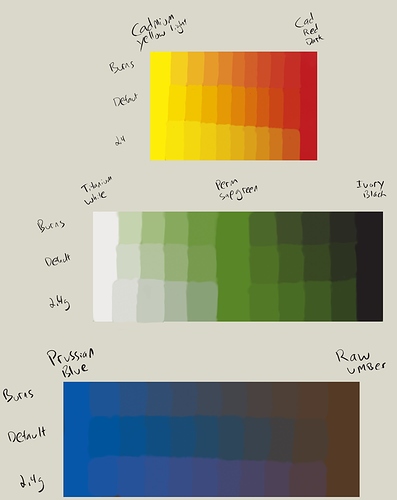
Here’s a couple more natural swatches using actual Winsor Newton oil colors (well, their RGB values)
For each set, the top gradient is Scott Burns’ SPD model. The middle the default Additive model, and the bottom is the Additive model with 2.4 gamma correction.
I’m probably a bit biased, but I think the Burns method looks a lot more natural, less saturated, and the intervals are much more consistent between the first and last steps (these are 10% intervals using a static smudge ratio). The default additive blend just seems too colorful, and the interval between the start and end is more abrupt, especially at burnt umber. Doing gamma correction at 2.4 for additive doesn’t seem to be quite right either, the interval at the end gets even worse. However, maybe it is more “correct” in a technical sense, dealing with light? Could it be that every program uses the 1.0 gamma because it seems to approximate a subtractive color model?
I’m going to post a few more swatches. The next step I think is to see if the memory requirement can be addressed. 2.3GB of ram is pretty crazy. Do we really need 256^3 SPD curves in memory, or can we get by with a smaller number representing the fully saturated colors, and then adjust the brightness within HSV or HCY, etc?
Here’s some more swatches, including some tints and shades with perm sap green.
Here’s another article discussing gamma and RGB mixing. Photoshop has a “Blend RGB colors using Gamma: xxx” option that sounds like the equivalent setting I made (called Smudge_Gamma). But the description of this setting seems to support the idea that the widely implemented “wrong” uncorrected gamma has been used because it is a somewhat workable substitute for a true subtractive model that artists expect. “Artistically correct” versus “colorimetrically correct”, as the Peachpit article put it. I think Scott Burns gives us a 3rd option-- to have both these things, Artistically and colorimetrically correct blending.
TO TEST:
- Build and install the unofficial “Burns” branch of libmypaint: https://github.com/briend/libmypaint/tree/Burns
- Build MyPaint as normal from official sources: GitHub - mypaint/mypaint: MyPaint is a simple drawing and painting program that works well with Wacom-style graphics tablets.
- Download and unzip rgb.txt (mirror) and place in the same folder as mypaint executable. (Alternative to downloading: you can generate the file using the generate.sh script inside the RGB folder inside libmypaint sources, but you must install Matlab or GNU Octave and it could take a couple days)
- Run mypaint and set a brush to use smudge settings with Smudge Add/Sub = 1.0. I recommend setting Smudge Lock to 1.0 and then choose a static smudge setting like 0.5 so you can mix the canvas color with the brush color in a 1:1 ratio. Then try other ratios like .33 (1:2), 0.20 (1:4) and 0.10 (1:9). Of course you could just control smudge with pressure, stroke, etc but you won’t know exactly what’s going on with the ratios.
- MyPaint will “hang” for quite a while as it loads the rgb.txt. You’ll see memory spike to 2.3 GB or so. After that it should be smooth sailing, the CPU usage is not dramatically different. Yes, the memory usage needs to be addressed after the proof of concept is validated

TODO:
- Address memory consumption (but may be at the cost of increased CPU)
- Add a new Burns mode to the brushmodes here and here, so that hardness, pixel feather don’t re-introduce the wrong blend mode into the dab. Maybe a more generic brush setting called Add/Sub would make more sense, without cross-fading to keep things simple. That way, everything would be either additive or subtractive.
- Add Burns mode as a layer mode to MyPaint GUI. This will be really nice, similar to multiply mode, but actually behaving more like mixing paints instead of layered glass. Using layers would also be a way to preserve the provenance of a color. For example, you could have a bottom layer of yellow, and any layers on top would always contain a trace of that yellow color and be influenced by it. Whereas without layers that yellow color history is “lost” as soon as you mix with another color to create a new identity. Scott Burns suggested that each pixel store this identity composition, but that sounds like a couple orders of magnitude more resource intensive than the current overhead

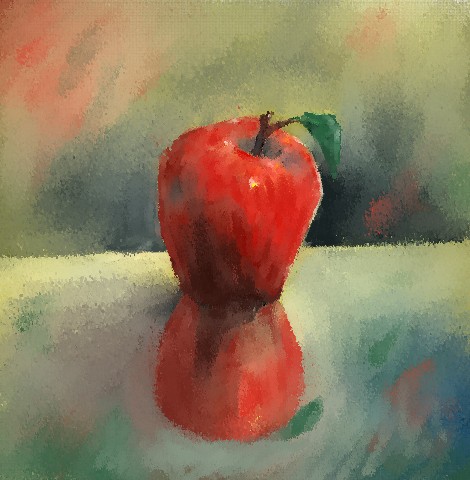
Here’s an apple I painted to try to show how easy it is to get subtle colors now. I think partially it is because the mixing is more linear, so it is much easier to control the mix ratio with pressure. It feels more natural and forgiving. This is just a basic brush with jitter and smudge controlled by pressure.
Here’s a youtube clip to show a comparison of cyan on red, which is a very hard color to mix on the computer. Not even Corel Painter seems to do any better than MyPaint. But with Scott Burns mode the colors mix naturally and produce many subtle hues
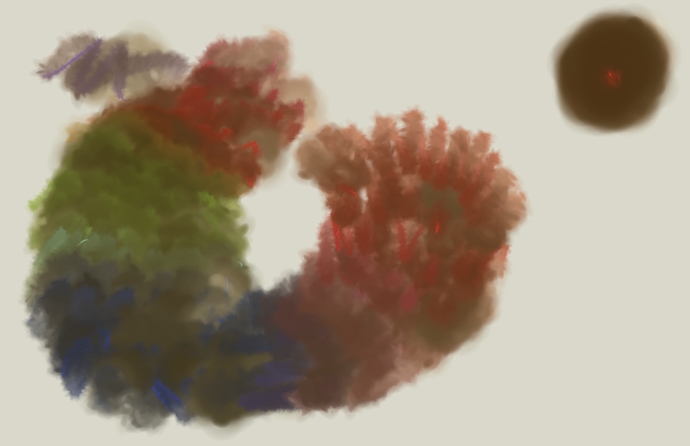
Here’s another test smudging some of the default mypaint “water color” palette colors.
I had a rounding error that caused the brush to get ever-so-slightly lighter the more you smudged-- and I actually liked the effect. So I fixed the rounding error but you can get the same effect by adjusting the smudge_gamma a tiny bit from 2.4 up to 2.41-2.45. I demo the difference in this video
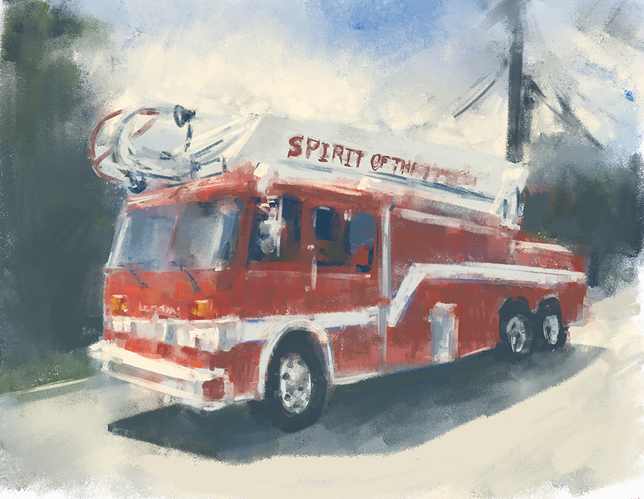
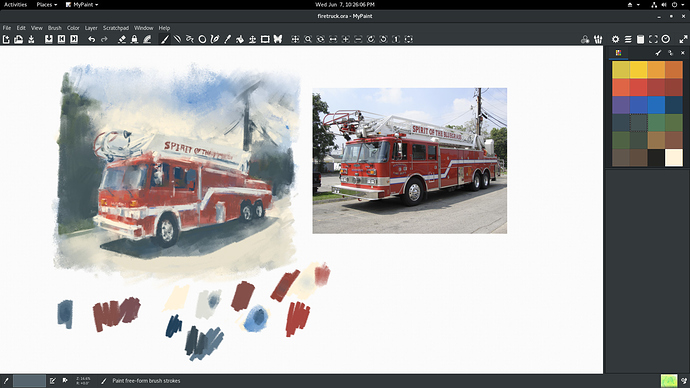
Here’s another demo. Who needs a palette when you can just mix paint below the image :-). Most of the colors were just picked straight from the “watercolor” palette and blended directly on the canvas.
Here’s a chart comparing some of the mix modes I’m working on. Burns mode is still my favorite but still not sure how to approach the 2GB memory issue.
I think the blacks seem strong because I’m doing naive summation of floats here:
https://github.com/briend/libmypaint/blob/Burns/mypaint-brush.c#L604
so I will try to implement the Kahan method and see what happens
@briend this is absolutely incredible! I really really hope that you manage to get it merged in trunk!
Thank you for the awesome work ![]()
It really shows when you see blue getting mixed with yellow. Soo much better than rgb mixing!!
If anyone has downloaded the rgb.txt files I’ve provided, I realized one line in that file was damaged and missing some values. Either redownload the file or just run this on a bash prompt to fix that one line. I have no idea why it was missing some values, but it broke the pure cyan color (0,1,1) (which apparently I never use)
sed -i '65536s/.*/0.8691387563938123,0.8693194684686003,0.8700985534234721,0.8738431043182661,0.8869600453360157,0.9263897480031636,0.993147433989089,1,1,1,1,1,1,1,1,1,1,1,1,1,0.8596336245856192,0.3647169251172724,0.1763737028386263,0.1061126017275838,0.07633598375157205,0.06236997769786758,0.05527285217930553,0.05166453073696637,0.04981841404945313,0.04890137397096261,0.0484635917059805,0.04826405060780531,0.04816655517870443,0.04812121937206788,0.04810339872727012,0.04809697871841827/' rgb.txt
I’ve submitted a PR for this, hopefully after a few more loose ends this thing will be ready:
https://github.com/mypaint/libmypaint/pull/109
Until now I wasn’t really doing anything with the alpha channel, because applying the alpha to the RGB values resulted in bad paint mixes. Scott Burns’ implementation doesn’t include anything about alpha compositing. To avoid weird artifacts I was painting on non-transparent layers by following the old tradition of covering the canvas with a coat of paint (gesso). This is ridiculous ;-). The problem (I think) is that you can mix “dimmed” lights without affecting the resulting color, but mixing “dimmed” paints would mean actually mixing a darker paint. When we say “alpha” in the context of paint, we probably mean the density of its pigment, or its concentration. So I’ve applied a formula to take the alpha components and adjust the “mix ratio” to account for each paint’s alpha (concentration). Please take a look at this spreadsheet and let me know if I’m crazy or making it too complicated. Initial results are much better since grabbing alpha pixels does not mix in these random darker paints anymore.
Since I added more smudge buckets it’s now possible to demo different modes in real time using X offsets and custom input mapping. Here is a real-time video comparison: https://youtu.be/RUa8IHNtGb4
So, I think this demonstrates the different response to pressure mapped to the mix ratios. The linear modes are much more sensitive to light pressure and give gradual responses. Whereas the non-linear mode (default) quickly jumps to stronger mixes, making it very difficult to blend subtle gradients.
I repeated the test with each mode as the “master” controller since it wouldn’t be fair otherwise, but it is interesting that even when the linear pigment is a “secondary input”, the results are still pretty good, which I think is because it is more stable due to it’s linear nature.
So after talking more with @troy_s I realize this whole thing is not just about subtractive vs additive. It’s whether you’re mixing with 3 wavelengths of light versus a lot more (36). By just changing Scott’s mixing algorithm from a multiplicative (subtractive) mode back to the standard additive model, we can greatly improve even our standard additive blending method. It’s hard to tell from this screen shot, but the spectral method is much easier to control just like how I’ve been going on and on about the subtractive mode.
I am a new mypaint user (but a classically trained painter) and I am really looking forward to this being added to a Windows build/release. Is there any work being done to make that happen? Though I do have dev Linux environments I do not use my tablet on them. Would it be better to just download the src and build than to wait?
Thanks for your interest! It might be a very long time before anything of this is ever ready for mainstream release, so don’t wait :-). You don’t have to use Linux, but it might be easier. If you can manage to build MyPaint on Windows w/ MSYS2, this patch will work, too.
So basically build and install my patched libmypaint: https://github.com/briend/libmypaint/tree/Burns
then build official MyPaint (gui): GitHub - mypaint/mypaint: MyPaint is a simple drawing and painting program that works well with Wacom-style graphics tablets.
then you’ll probably want to download my brushpack which has brushes already configured w/ the settings: GitHub - briend/Brushes: MyPaint Brush packs
And there is more info here, link to download the data file, etc: https://github.com/briend/libmypaint/tree/master/burns_subtractive_mode
I will give building with MSYS2 a shot! Thank you!
So I nearly gave up on spectral because of the huge 12GB data file I thought I needed, but I took a stab at doing spectral upsampling of RGB to 3 spectral primaries (built using the original Scott Burns method) and doing everything with just those three curves instead of 256^3 curves. I think it’s pretty decent looking. I’ve started a new thread over here:
https://community.mypaint.org/t/smudge-tweaks-testers-needed/1202
and includes a windows installer for you to test. No need to download any big rgb.txt data file or anything. It just works out of the box. Recommend you try my brushpack though.
